
Description
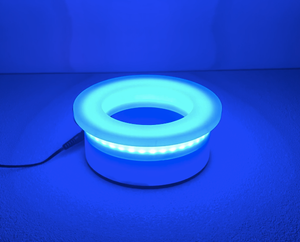
The Illuminated Hole Cup is a fantastic addition to any mini-golf course. Its durable construction ensures that it'll always withstand the rigours of a mini-golf course and the white acrylic material provides a sleek, modern look. The built-in sensor allows for a variety of light effects to be produced when the ball enters the hole to enhance the experience for players. The hole cup can be integrated into new courses or retrofitted into existing ones.
Match your brand! White? Green? Rainbow effect?! Let us know what colours or animations you want, and we'll program it free of charge!
Features
- The body is made from specialist LED acrylic
- Built-in sensor programmed for a standard golf ball
- Custom lighting colours and effects
- Supplied with a 12V 1A power supply
Specification
- 160mm diameter
- Requires 230V mains power
Additional Information
Quick Setup Guide
- Place the hole cup in the desired location, ensuring there is enough room for the sensor, wiring, and power connector.
- Plug the power supply into any 230v mains socket and plug in the device.
- Secure the hole cup to the base of the hole – we recommend a few dabs of soft but strong silicone.
Troubleshooting Guide
- Animation constantly triggering
This is often caused by the sensor becoming blocked by debris. The sensor should be cleaned regularly, either with a vacuum or with compressed air. If debris cannot be removed this way, we suggest removing the hole cup and cleaning the sensor from the outside. - Animation is not triggering
Firstly, check that the hole cup is powering up. This can be done by checking for a red light, visible by looking towards the base of the cup, when a golf ball is present. If the sensor is triggering but the animation is not, it's likely that the LED wiring is damaged or has come loose. To resolve this, remove the hole cup and switch off the power; using a small flathead screwdriver, carefully unscrew each wire and resecure the connections. Ensure the correct wires return to the correct terminal.
Recommended Maintenance
We suggest cleaning the sensor 2-3 times per week with a vacuum cleaner or with compressed air.
Spares
Coming soon
See it in action
0:00
/0:42
Downloads
Coming soon
Want to place an order?
With an account you can generate a quotation, place an order, raise a service ticket and access user manuals.
Request an account
Already have an account?
Sign in
